Sunday, December 31, 2006

Vasilopita

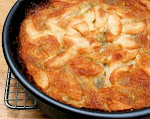
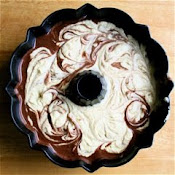
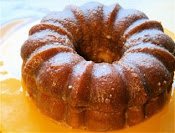
Every New Year my family and I celebrate with a Greek tradition, the Vasilopita Observance. This custom began in the fourth century when a bishop, Saint Basil the Great, wanted to distribute money to the poor members of his flock. To avoid demeaning this proud people, St. Basil commissioned the ladies of his church to bake coins into a sweet bread, thereby hiding his offerings. When the families cut into the nourishing bread they surprisingly found gold coins as well, and the New Year’s tradition of baking coins into a sweet yeast-risen cake-like bread was born. While my mother never baked a traditional vasilopita, nor ever baked the coins directly into the cake, she would, true to custom, hide a variety of coins into a finished cake—whatever cake she felt like making that year. Today, the head of household divides the cake equally for each member of the family, and in traditional households, in commemoration of St. Basil’s love and concern for the poor, an additional piece of cake is cut to represent the unfortunate of the world. The one who receives the piece containing the special coin—a silver dollar in my home—allegedly will have an especially lucky year. Since leaving home I have introduced many friends to this Greek tradition and each year I am reminded of the fun generated by anticipating and hoping to receive that lucky coin. This year, in an effort to avoid sharing a whole cake with my husband, I have baked mini Rum Bundt Cakes, the preferred New Year’s cake in my family, and will give the extras to friends. While I cannot promise that partaking in the Vasilopita Observance will bring health and happiness to all who participate, as hoped by St. Basil the Great, I can attest that the ritual of making New Year's resolutions is more fun while eating a rum-soaked coin-filled cake. Happy New Year!

Mini Rum Bundt Cakes
Yield=6 mini cakes Serves 12

For Cake:
10 tablespoons (5 oz) unsalted butter, room temperature plus more for the pan
¾ cup + 2 tablespoons granulated sugar
1 yolk
2 eggs
1 cup + 2 tablespoons (5.5 oz) all-purpose flour plus more for the pan
¾ teaspoon baking powder
¼ teaspoon table salt
2 tablespoons milk
3 tablespoons rum
¾ teaspoons vanilla extract

For Glaze:
8 tablespoons (4 oz) unsalted butter
½ cup sugar
¼ cup rum

For a fun touch, or a festive Valentine's Day dessert, add a pink glaze:
1¼ cup confectioners' sugar
3 tablespoons brandy
3 tablespoons rum
1-2 drops pink food coloring

Position oven rack in center of oven and heat to 350˚F. Butter the mini Bundt pan and lightly dust with flour, shaking out excess.
In the bowl of a standing mixer fitted with the paddle attachment, cream the butter and sugar until light and fluffy. Add the yolk, and beat until smooth. Add the eggs one at a time, blending after each addition. In a small bowl, whisk together the flour, baking powder and salt. In another small bowl combine the milk and rum. Add half the flour mix to the mixer and blend until just smooth. Add half the milk mixture and blend until smooth. Add the rest of the flour and again blend only until just combined. Add the rest of the milk mixture and blend until smooth. Finally add the vanilla and blend until smooth.
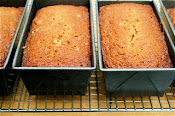
Divide the batter evenly among the six molds and place in oven. Bake the cakes for 25 minutes.
Meanwhile prepare the glaze. Gently heat butter, sugar and rum until butter has melted and sugar has dissolved. Set aside.
After the 25 minutes, remove the cakes from the oven and test for doneness. It may look wet and spongy but still test with a paring knife. If the inserted knife emerges clean, the cakes are done. If not, return pan to the oven, checking every 2 minutes.
When cakes are done, remove from oven and spoon about 1 tablespoon of rum glaze (the first glaze listed above) on top of each cake. Let cakes cool in pan for 20 minutes before turning out onto a cooling rack. Brush a layer of glaze on top of each bundt cake, let harden (about 10 minutes) and then paint another layer on. Repeat until all of the glaze is gone.

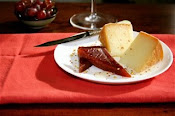
Cut a small slit in the bottom of the cake and insert a saran-wrapped small coin into the slot. When ready to serve, divide the cake equally between the number of participants (hopefully no more than 2 per cake), enjoy your small portion and discover who is the lucky recipient of the coin. Make New Year’s resolutions and enjoy!

At this point, if desired, the pink glaze can be added on top of the first rum glaze. Whisk all ingredients together until smooth. Spoon glaze into center and gently push out with the back of the spoon so that the glaze falls down the sides of the cake.

Note: To make a normal sized Bundt cake, just double the ingredients for the cake, not for the glaze.
For more information about the Vasilopita Tradition visit: http://www.stbasil.goarch.org/about/vasilopita.asp

Saturday, December 30, 2006

"Alta" Brussels Sprouts

Last night my husband and I traveled to New York to meet a group of friends for an impromptu dinner at Alta, a tapas restaurant in the West Village. Between the seven of us we shared 20 delectable small plates with the unanimous favorite being the Crispy Brussels Sprouts with Fuji Apples, Crème Fraîche and Pistachios—it was the only dish we ordered twice! I have already written to the “R.S.V.P” and “You Asked For It” sections of Bon Appetit and Gourmet magazines, respectively, requesting this recipe from Alta’s Chef Mosher, but in the meantime I have done a little experimenting of my own. While my husband and I were not disappointed with my attempted re-creation—charred Brussels sprouts, sweet apples, sour crème fraîche and toasted pistachios alone combine to form a delicious mixture of contrasting flavors and textures—something was missing. At Alta, over our second plate of these crispy mini cabbages, we all mused and speculated about this indiscernible ingredient: a very flavorful, at once vinegary, sweet and sharp sauce present in each mouthful. Here, I’ve reduced balsamic vinegar with honey to capture this effect and until I hear from one of the above contacted authorities with the secret formula, I can survive with this substitute. While we enjoyed this side dish tonight with our hamburgers, the combination of Brussels sprouts and apples would be especially delicious served aside a nice, juicy pork chop. Enjoy!

Roasted Brussels Sprouts with Apple, Crème Fraîche and Pistachios
Serves 2

10 oz Brussels sprouts, tough stem removed and halved
Extra virgin olive oil
Kosher salt and freshly cracked pepper to taste
3 tablespoons balsamic vinegar
1 tablespoon honey
2 tablespoons pistachios, toasted and coarsely chopped
1/2 Fuji Apple, unpeeled and thinly sliced
1 tablespoon crème fraîche, or more to taste

Preheat the oven to 450˚F. Toss the Brussels sprouts with enough olive oil to coat, a generous pinch of salt and pepper to taste. Meanwhile, in a small sauté pan, gently simmer the balsamic vinegar with the honey until the mixture has reduced and is slightly thickened, 3-5 minutes. Set aside.
After 15 minutes, remove the Brussels sprouts from the oven, stir and rearrange with a spoon and test one with a paring knife. If the Brussels sprouts are not sufficiently charred or tender, return to the oven for five minutes. If they appear to be charring too much, reduce the oven temperature to 400˚F and continue roasting until they are knife-tender.
When the Brussels sprouts are finished cooking, remove from the oven, transfer to a bowl, and add the pistachios and apple slices. Pour the reduced balsamic mixture into the bowl and toss to coat evenly.
Transfer mixture to serving platter and top with a dollop of crème fraîche. Serve immediately, seasoning with more salt if necessary and more crème fraîche if desired.

Thursday, December 21, 2006

Almond-Buttermilk Scones

My many intentions to bake lots of holiday treats this season have amounted, uncreatively, to the sole production of these scones. In an attempt, truthfully, to avoid leaving a nearly full quart of buttermilk in the refrigerator before leaving for Minnesota for the holidays I perused my recipe collection for a solution. After considering various biscuit, cornbread and panna cotta recipes, I opted simply to make a batch of my favorite buttermilk scones. I prepared and divided the dough at night, placed two scones on a cookie sheet in the refrigerator and froze the rest. In the morning, I baked off the reserved two and my husband and I happily enjoyed these flaky, not-too-sweet, and almond-packed treats for breakfast. They make a nice change from a usual routine of oatmeal and toast and feel quite festive this time of year. Any other nut, fruit or flavoring can be substituted for the almonds and the dough freezes beautifully. Enjoy!

Almond-Buttermilk Scones
Yield=6

a scant 2 ¼ cups (10 oz) all-purpose flour
¼ cup plus 1 tablespoon (2.33 oz) sugar
1½ teaspoon baking powder
¼ teaspoon baking soda
½ teaspoon kosher salt
1 cup sliced almonds
2/3 cup buttermilk
1 teaspoon vanilla extract
1 stick cold unsalted butter

2 tablespoons milk
turbinado or demera sugar for sprinkling

Preheat the oven to 375°F.
In a medium to large-sized mixing bowl whisk together the flour, sugar, baking powder, baking soda and salt. Add the almonds and stir to combine. In a small bowl, whisk together the buttermilk and the vanilla. Cut the cold butter into the flour mixture and stir to combine. Add the buttermilk mixture to the flour mixture and stir to combine. Gently knead the dough together in the bowl until it is just combined. Be careful, however, not to mix and knead the dough too much—you just want to combine the ingredients. If you have to add a tablespoon more of buttermilk, do so, but otherwise just gently pack the mixture into a ball and then turn dough out onto a work surface. Gently pat and shape the dough into a rectangle approximately ¾ to 1 – inch thick. With a knife or bench scraper, cut the dough into six triangles. At this point, either freeze the cut scones in a zip lock bag or place them on Silpat or parchment paper-lined cookie sheet. Brush the scones with the milk and sprinkle with the sugar. (Note: you can brush the scones with anything you like: eggs, egg whites, cream, even water. If you don’t have turbinado or demera sugar, regular granulated sugar is a fine substitute.) Bake the scones for approximately 15-18 minutes. (When you bake frozen scones, remove them from freezer while oven preheats. Brush with wash just before baking and bake 18-23 minutes.) Serve immediately.

Monday, December 18, 2006

Roasted Vegetables

There could not be a simpler method to prepare vegetables than roasting. These are simply tossed with extra-virgin olive oil, kosher salt, coarsely ground black pepper and fresh thyme, spread on a jelly-roll pan, and roasted for about forty-five minutes, or until each vegetable is knife-tender. If ever you are feeling devoid of vitamins or nutrients or are simply looking for a way to incorporate more vegetables into your diet, prepare this recipe. It is delicious! The recipe can be adjusted and applied to a variety of vegetables so long as each vegetable is of similar density. Here, however, the red bell pepper is an exception: the peppers caramelize nicely with the extra cooking time and moreover add beautiful color to an otherwise dull mix. Enjoy!

Roasted Vegetables
Serves 4

1 medium-large sized carrot, peeled
1 medium-large sized parsnip, peeled
1 sweet potato, peeled
5-6 large shallots, peeled
1 medium-large sized fennel bulb, fronds and rough end removed
1 large red bell pepper, stem and seeds removed
3-4 sprigs fresh thyme, leaves removed and chopped
1-2 tablespoons extra-virgin olive oil
kosher salt and pepper to taste

Preheat the oven to 400°F. Cut carrots, parsnips and sweet potatoes into pieces approximately 1½ inches thick. (The shape isn’t that important—in fact, irregular shapes look nice—but to ensure uniform cooking, try to cut all the vegetables into approximately the same size.) Keep medium-large sized shallot pieces whole and cut large shallots in half. Cut the fennel bulb into medium-sized wedges and cut the bell pepper into 1-inch irregularly-shaped cubes. Sprinkle the vegetables with the thyme leaves, toss with enough oil to nicely coat, and season with salt and pepper to taste.
Spread vegetables onto a rimmed baking sheet and bake for 20 minutes. Remove from oven, stir and rearrange vegetables, and return to the oven for another 15 minutes. Remove from the oven again, test a sweet potato and a carrot to make sure each is knife-tender. If vegetables need more time, return to the oven again and test every five minutes until done. Remove from the oven, taste, adjust seasoning with more salt and pepper if necessary and serve immediately.

Monday, December 11, 2006

Ciabatta

I normally cannot resist a sandwich pressed on soft, airy focaccia or wholesome, seeded multigrain bread, but every so often a fresh, crusty ciabatta roll is a nice change. In Italian, ciabatta means 'slipper,' which its elongated, flat, rectangular shape vaguely resembles. Ciabatta has a crisp crust, a soft porous interior and is light to the touch. The thin crusty exterior forms an ideal base to house heartier fillings such as roast beef, ham or grilled chicken breasts; and its soft interior absorbs spreads and sauces, without getting soggy—ciabatta holds up nicely under pulled pork, chicken parmesan and even hamburgers. This past Monday I made these slipper-shaped rolls for a honey-roasted ham, Gruyère cheese, Bosc pear and grainy mustard sandwich served at an office luncheon. It was a nice combination and because the bread was fresh, no toasting or pressing was necessary. Toasting, however, will fortify the exterior and ensure an especially solid base for a wetter filling such as pulled pork. Making ciabatta does require a starter, so a little planning is necessary. Slice and freeze any extra rolls—this recipe makes 6 4.5-oz sandwich rolls—and defrost and enjoy as needed.

Ciabatta
Yield 6 4.5-oz Rolls

Starter:
1/2 cup (4 oz) water
a scant cup (4 oz) bread flour

8 oz starter (see recipe below)
3/4 cup + 1 T. (6.5 oz) water
a scant 3 cups (13 oz) bread flour
1 Tablespoon honey
1/2 tsp. instant yeast
1 teaspoon table salt
cornmeal for dusting

To make the starter, combine the water and flour in a small bowl. Let bubble slightly, stir and let sit at room temperature overnight.

To make the bread, combine the starter, water, bread flour, honey and yeast in the bowl of a stand mixer fitted with the dough hook. Mix at low speed for 1-2 minutes until combined. Add the salt and increase the speed to medium-low and mix for 6-7 minutes longer adding a little flour if necessary. (If the dough isn't wrapping around the hook or leaving the sides of the bowl at all, add flour. Be careful not to add too much additional flour, however, because the dough should be slightly sticky and moist.) Transfer dough to a slightly oiled bowl, roll around to coat, cover bowl with plastic wrap and let rise until doubled in bulk, about 1½ - 2 hours.
When dough has doubled, punch down and turn out onto a lightly floured work surface. Portion the dough into 4.5-oz balls, or divide the dough into approximately 6 equal portions. Gently knead and roll each portion into a ball, and let sit on the work surface covered with plastic wrap for 30 minutes. After the 30 minutes, grab each side of one ball with each hand and gently pull outward to stretch into a rectangle. Repeat with remaining balls. Let rest covered with plastic wrap for another 30 minutes.
Preheat the oven to 450° F. Line 2 sheet trays with parchment paper or Silpats. (I used one regular sized sheet pan and one slightly smaller pan. I still wasn’t able to fit the pans side by side on one rack, so I baked them on separate racks and rotated them after 10 minutes of baking.) Lightly dust pans with cornmeal. After the 30 minutes, grab the sides of the rectangular shaped-dough forms, gently pull outward again and transfer to the prepared sheets. Let the dough rest again until the oven has preheated, about another 30 minutes.

When the rolls have slightly puffed again, bake until golden brown, about 10 minutes. Rotate the pans and bake for 3-5 minutes longer until nicely golden. Remove from the oven and transfer to a cooling rack immediately. Let cool completely before using.

Saturday, December 9, 2006

Rad Na Thai Shrimp

Every so often I find myself craving Continental’s Rad Na Thai Chicken. I was first introduced to this warm bowl of fresh rice noodles, bean sprouts, scallions, peanuts, chicken and slightly wilted romaine by a friend who described it as “a big bowl of goodness.” And that it is. You can imagine my excitement when I came across a recipe for this Continental staple in Aliza Green’s new cookbook, Starting with Ingredients. More exciting was discovering how easy the dish is to prepare—the sauce only has four ingredients—and once all of the ingredients are prepped, the dish takes fewer than ten minutes to complete. Here I’ve prepared the dish with shrimp but any cut of meat that can be quickly sautéed—thinly sliced chicken, pork or beef—can be easily substituted for the shrimp. Some of the ingredients, such as the fresh rice noodles, will have to be purchased at an Asian grocery store. My favorite is Hung Vuong Market at 11th and Washington (there is a link to the market in the sidebar). Look for the uncut fresh rice noodles that are packaged in clear plastic with red writing in the non-refrigerated section of the market.

Rad Na Thai Shrimp
Serves 3-4

Sauce:
6 tablespoons Chinese oyster sauce
3 tablespoons Asian fish sauce
3 tablespoons sugar
3 tablespoons rice wine vinegar

Combine all ingredients in a small pot and bring to the boil. Reduce heat and simmer 5 minutes. Cool before storing.
Keeps in the refrigerator for up to 1 week.

Rad Na:
2 tablespoons canola oil
1 pound shrimp 16/20 count, peeled and deveined, tails left intact
2 eggs, lightly beaten
1 pound fresh rice noodles, cut into 3/4-inch wide strips
1/2 teaspoon crushed red pepper flakes
Rad Na Sauce (see recipe above)
1 bunch scallions, thinly sliced
1/2 pound fresh mung bean sprouts
1 cup roasted salted peanuts
1 head romaine, outer leaves removed, cut into squares

Heat a skillet or wok until smoking hot. Add the oil and heat again until smoking. Add the shrimp and let cook on one side for about a minute and a half. Flip the shrimp, cook for another minute, and then transfer to a plate--the shrimp should still look slightly raw (they'll continue cooking as they sit and they'll finish cooking at the end when they are tossed with all of the hot ingredients). Let the oil heat up again, another 20 seconds or so, then add the eggs. Stir vigorously to break up the egg as they cook.

Add the noodles, crushed pepper, and Rad Na Sauce. Stir to combine and coat noodles. When noodles are hot and coated with the sauce, add most of the scallions, most of the sprouts, and most of the peanuts. Return the shrimp to the pan, stir well to combine and coat all of the ingredients with the sauce and remove from heat.

Divide the lettuce between 4 bowls. Top with the hot noodle mixture and garnish with the remaining scallions, bean sprouts, and peanuts. Serve immediately.

Wednesday, December 6, 2006

Steak Frites with Aioli

Last night my husband and I had the pleasure of dining at Monk's for the first time since the institution of the smoking ban. What a treat! Unspoiled by oppressive smoke, our Belgian ales and pommes frites with bourbon mayonnaise tasted exceptional. If you have a deep-fryer at home, recreating this classic bistro fare is quite simple; if you don't, the process of frying the potatoes will just be slightly more involved. As for the bourbon mayonnaise, we were only able to coax our waitress to reveal a few ingredients--bourbon, mayonnaise, garlic and jalapenos--the rest is the chef's secret. I've supplied a recipe for a spicy aioli, which is delicious with frites and a little less creamy tasting than Monk's famed condiment. The aioli recipe yields more than enough for two servings of frites and will keep for weeks in the refrigerator. Enjoy!

Steak Frites with Aioli
Serves 2

2 egg yolks
2 T. Dijon mustard
2 cloves garlic
3 T. capers
2 tsp. fresh lemon juice
1 tsp. Sriracha*
1 tsp. red wine vinegar
½ tsp. Worcestershire sauce
½ tsp. kosher salt
½ cup grapeseed oil
½ cup olive oil (not extra-virgin)
* (available at Asian markets, or use ½ tsp. cayenne pepper)

1 tsp. black peppercorns
1 tsp. Szechwan peppercorns*
1/2 tsp. white peppercorns
1/2 tsp. red peppercorns
* If you can't find Szechwan peppercorns or red peppercorns, just use a mix of black and white
1 tsp. olive oil
kosher salt
2 New York Strip Steaks, 1-inch thick
1 tsp. canola oil

4 cups peanut or canola oil for frying

1 Idaho potato
¼ cup all-purpose flour
kosher salt to taste

To prepare the aioli: combine yolks, mustard, garlic, capers, lemon juice, Sriracha, vinegar, Worcestershire and salt in a blender or food processor. With motor running, slowly drizzle in the grapeseed oil followed by the olive oil—drop by drop at first, and then more quickly once you see the mixture begin to emulsify. Taste, adjust seasoning with more salt if necessary, and chill until ready to use. Will keep for 2 weeks in the refrigerator.

To prepare the pepper rub, toast all of the peppercorns over medium-high heat in a small heavy skillet. After about 2-3 minutes, when the mixture is fragrant, transfer mixture to a spice grinder and coarsely grind. Pat the steaks dry, rub each side with the oil, then rub the peppercorn mixture all over each side. Sprinkle each side with kosher salt and set aside.
Preheat the oven to 450˚F only if you prefer your steak cooked more than rare. Heat a heavy oven-safe nonstick skillet or cast iron pan over high heat. Add the teaspoon of canola oil, swirl around, then add the steaks. Let cook 3-4 minutes on one side. Flip and cook for another 3 to 4 minutes for rare. If you prefer your steak more well-done, transfer skillet to oven and cook until desired temperature is reached. Transfer the steaks to a cutting board and let rest for 5 minutes. While the steak rests, cook the frites:

Heat oil in heavy, straight-sided pot till 375˚F or preheat your deep-fryer. Meanwhile, peel potato and julienne on mandoline. Place potato strips in a bowl and lightly coat and toss with half of the flour. If not all of the pieces are lightly coated, use the additional flour. When oil is ready, gently lower potatoes into oil with a spider or clean bowl—don’t dump the potatoes in using the same bowl in which they were coated with flour. When potatoes are crisp and golden, remove from oil with spider or tongs, let drain slightly and sprinkle to taste with kosher salt.

Serve immediately with aioli.

Monday, December 4, 2006

Rosemary-Olive Dinner Rolls

My inspiration to make these rolls again stems from a recent restaurant experience. The other night, my husband and I met two friends for dinner for a late dinner at Meritage (20th and Lombard). We sat at the bar, ordered a bottle of wine and spent the first hour chatting. By the time we placed our order, we were all famished--a condition wholly magnified by the wine. Needless to say, the timing could not have been more perfect for the delivery of the piping hot seeded and salted rolls to each of our bread plates. Although the bartender warned us that the rolls had just emerged from the oven, none of us could refrain from tucking in. Sometimes nothing satisfies like warm bread and butter. These rosemary-olive pull-apart rolls similarly release steam as they are separated and are delicious when served immediately with softened butter.

Rosemary-Olive Dinner Rolls
Yield=9 (2-oz) Rolls

Starter:
1/4 cup (2.5 oz) water
a heaping 1/2 cup (2.5 oz) whole wheat flour

Rolls:
1/4 cup (2.5 oz) starter
1/2 cup (5 oz) water
1 and 7/8 cup (8.5 oz) bread flour
1/2 tsp. instant yeast
1/2 tsp. table salt
1/4 cup (2 oz) chopped, pitted Kalamata Olives
1 tablespoon finely chopped rosemary

To make the starter, stir together the flour and water. Let stand at room temperature until bubbles slightly, stir to combine, then cover with plastic wrap and let stand at room temperature overnight.

The next day, place 1/4 cup or 2.5 oz of the starter into the bowl of a stand mixer. (See note below for what to do with remaining starter.) Add the water, bread flour and yeast. Mix on low speed for one minute until the mixture has come together slightly. With the mixer running add the salt, increase the speed to medium-low and mix for five minutes. The dough should be balled up around the hook. If it is not, add more flour a little bit at a time until the dough is wrapped around the hook. After five minutes, return the speed to low, add the rosemary and olives and mix for 1-2 minutes until olives are slightly incorporated. Stop machine, scrape down dough, and turn out onto lightly floured work surface. Knead for 2-3 minutes until the rosemary and olives are evenly incorporated. Dust some more flour onto the board, cover dough with clean kitchen towel and let rest for 90 minutes at room temperature or until almost doubled in size.


After the 90 minutes, start dividing the dough. I portion each roll into 2-oz pieces, but if you don't have a scale, roughly divide the dough into 9 equal pieces. Line a sheet pan with parchment paper or a Silpat. Ball each piece of dough into a nicely shaped roll and place on prepared sheet. Place the rolls next to each other--just barely touching--so that when they rise, they rise into each other. Lightly spray the tops with cooking oil or with water, cover loosely with plastic wrap and place in a warm area to rise again, until nearly doubled in size. Depending on how warm the area is, this may take between 30-50 minutes. Preheat the oven to 475 degrees F.

When the rolls have puffed nicely, gently remove the plastic wrap and place in preheated oven. Bake for approximately 15 minutes. If rolls sound hollow when gently tapped, remove them from the oven. Otherwise, return to oven to bake for 3-5 minutes longer, check again, and remove when ready. Bring to the table, gently pull apart (be careful of the hot steam), and serve immediately with softened butter. Enjoy!

Note: You may have extra starter. Place remaining starter in a Tupperware container, add one cup of water, and one cup of whole wheat flour, stir, let sit until bubbles, stir again, then store in refrigerator until ready to use for another recipe. It will keep forever. I always have a white and a whole wheat starter in my refrigerator, and I "feed" them with equal parts flour and water each time I take from them.

Sunday, December 3, 2006

Barely Wilted Spinach Salad


Although my kitchen shelves are filled edge to edge with various cookbooks, I always find myself referring back to a select few. One happens to be Alice Waters' Chez Panisse Vegetables. The other day I was looking for a sautéed brussels sprouts recipe, became unintentionally engrossed and found myself in the spinach section. In this section Alice Waters describes a simple method for making a warm spinach salad. It basically involves placing fresh spinach in a stainless steel bowl, tossing the leaves with a little bit of dressing and heating the bowl over a pan of simmering water until the leaves are just barely wilted. The method works beautifully and is much healthier than using the traditional warm vinaigrette created by reducing rendered bacon fat with vinegar. Moreover, it is healthier than many salads in general because wilted greens require a smaller proportion of dressing than do unwilted greens. It is also delicious. Here, I've prepared the spinach in the classic Roman style with raisins, pine nuts and sautéed apples, but the recipe could be adjusted in any number of ways. For a nice winter side dish turn your favorite spinach salad into a warm wilted salad employing this method.

Warm Spinach Salad
Serves 2

6 oz baby spinach
1/4 cup raisins
1 tablespoon of olive oil
1 apple, peeled and small diced (I used a Honey Crisp)
1 medium shallot, small diced (about 1 tablespoon)
1/4 cup toasted pine nuts
2 Tablespoons balsamic vinaigrette (see recipe below)

Balsamic Vinaigrette:
2 tsp. honey
kosher salt and freshly ground pepper to taste
1 clove garlic, minced
1/4 cup balsamic vinaigrette
6 tablespoons grapeseed oil

To make the vinaigrette, whisk together the honey, salt, pepper, garlic and balsamic vinegar in a small bowl. Slowly drizzle in the oil, whisking constantly. Taste, adjust with more salt, pepper or oil if necessary. Store until ready to use.

To make the salad, place the spinach in a large stainless steel bowl and set aside. Fill a straight-sided sauté pan with one inch of water and heat until just barely simmering. If the raisins are very dry and shriveled, place them in a bowl and cover with some boiling water. Let stand 10 minutes until nicely plumped, drain and set aside. In a medium-sized sauté pan, heat 2 tsp. of the olive oil over medium-high heat. When oil is barely smoking, add apples and sauté until nicely golden brown, but still hold their shape, about 3-5 minutes. Transfer apples to bowl with spinach. Heat remaining teaspoon of oil in pan, add shallots and sauté until soft and slightly caramelized, another 3-5 minutes. Add the pine nuts and the drained raisins and sauté for 15 seconds more, then transfer to the bowl with the spinach. Toss the spinach mixture with the 2 tablespoons of dressing and place bowl over pan with simmering water. Increase the heat to high and with tongs, gently toss spinach in bowl until nicely wilted. Serve immediately. Enjoy!